By: Janani Hariharan (Art Lead)
This quarter I served as the Art Lead for one of levels in the game, the Cul De Sac level. This level was one that was touched on the previous quarter but was not pushed to art polish and also lacked elements of gameplay. As a level lead, my duty was to meet with my group every week and not only assign tasks and log them into Taiga, but to keep up on everyone’s progress. One thing I felt that was important as a lead was to hear everyone’s opinion and collectively discuss what we thought would benefit the level. As the group consisted of people of different practices; level design, quest design, 2D art, etc. I found that is was crucial that everyone’s voice and opinions were heard, as everyone’s input is what made the level that it is today. Additionally, my personal role as 3D artist remained, and I continued to model, UV map and texture assets, using Autodesk Maya, Photoshop, and Substance Painter. Additionally, the first few weeks consisted of me teaching and sharing my knowledge with others. When working in a studio, you find that there are people of many skill levels with knowledge in a variety of different things, especially with the new people that enter. And as a result, for a few weeks I spent time teaching others how to use Maya and Substance Painter as well as some fundamentals in modeling in texturing. I was proud and impressed to see how willing everyone was to learn and how far they have come in the process.
I would say my favorite part, and the part that I am most grateful about is how much more depth I was able to go into Unreal and how much I was able to learn. As this quarter was quite art heavy, I had to make sure I was familiar with a lot of of processes in Unreal, such as how to export maps properly out of Substance painter into Unreal and how to create and assign materials. I had to do research into how to achieve certain looks and how to create some things in a more effective way, allowing me to learn about more tips and tricks in the engine; I was also able to become well versed in functions such as creating decals, altering materials in engine, and doing more realistic lighting. Which in relation, I am very grateful to Allen and Will, for providing us not only with Unreal Workshops, but giving us the opportunity to listen to professionals from Epic Game, who came in and did a private workshop on lighting in Unreal. Furthermore, I became more well versed in using Perforce, as this is something I was a bit intimidated by and had some trouble with last quarter.
Something that I think improved so much this quarter, and I can now truly see the value of, is communication and collaboration. Despite how tough things have been his quarter with everything happening around us, and working from home, I think my team and I did a great job staying in contact with each other, asking for help when needed, sharing ideas, and really seeing the space as “ours”. We did have a bit of trouble last quarter balancing aesthetics with gameplay but I think we really improved on that this quarter. The quests and gameplay in the level have really come to life with the 3D and 2D art there to support it and heighten the experience. We were no longer stepping on each other’s toes and really built off of what each other was doing.
I’m really excited as to what next quarter is going to bring for the levels. Although I am saddened that most of teams consist of seniors that are leaving this quarter, I am very grateful and proud of the incredibly strong foundation they have set up for the next group of people. I truly believe that all of our levels and game in general is a point where things are coherent and clear as to what we have intended. I will be back next quarter and I am looking forward to working with a new group of artists, designers, and programmers. I am very excited to hear their thoughts and ideas, and see our game spread it wings and fly.
This a breakdown of certain assets I worked on a variety of skills I learned this quarter:

I began this quarter modeling all of the primary, “hero” assets in the level. This consisted of the houses with all of their parts (doors, porches, knobs, windows etc.) as well as the garages and house accessories such as electrical meters, barbeques, water taps, and gazebo. While a majority of these assets had a similar pipeline and execution, model, UV map and texture in substance painter, the houses themselves were a bit different. As it was a larger object, tiling became an issue, as if done as all in one piece in Substance Painter, the entire UV would get tiled, resulting in issues such as distortion, misplacement, and lack of resolution. As a result, each part of the house (walls, roof, porches, etc) had to be done as individual pieces and them imported into Unreal as separate materials (Mat_Roof, Mat_HouseWalls, Mat_RoofEdging) etc. However, I found that one benefit in doing this is that I could reuse materials for other houses as well as make variations in them such as in color or roughness value based off of material instances. So while there were more draw calls, I did have more flexibility in playing with materials.
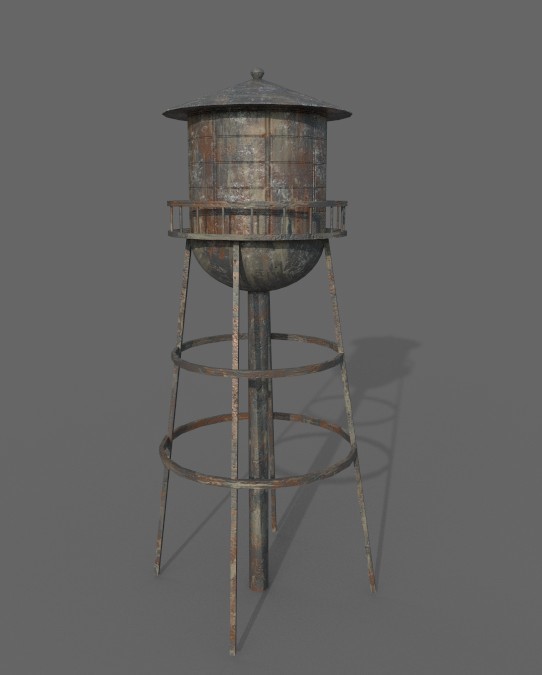
The following image, is one of the main assets I created that I was able to run through the standard game asset pipeline. It is a water tower that is to serve as a weenie, or guide for the player, as to which direction they should be heading. This asset as well as most others, was done in Autodesk Maya, both modeling and UV mapping. When modeling for the game, I had to always make sure that my poly count was low, this required thorough analysis as to what could be a normal map and what actually as opposed to actually modeling it out. I had to have good UV shells with consistent textal density. In this case I had to arrange shells by hand as I wanted the top of the water tower to have the best resolution compared to the legs. As I was not using UDIMS, multiple texture sets, I had to had to pack everything together as effectively as possible. Doing this work has made me realize how much I love texturing and bringing objects to love and how amazing a tool like Substance Painter really is.

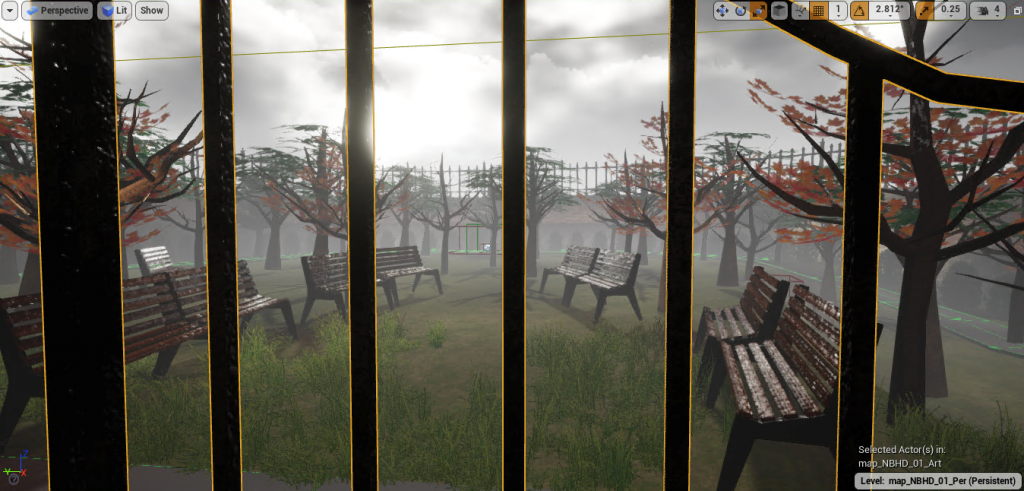
Another important skill, not only Unreal related, but for gameplay optimization in general was the proper and appropriate use of alphas. For example, in this park all of the leaves on the trees and bushes were done using transparent textures, or alphas. Each bundle is only plane, making the poly count of each tree very, very low as opposed to modeling out every branch and every leaf for an entire park. The process of creating these took some getting used to, as there was a lot of back and forth between Photoshop and Substance painter to create the proper maps. I had to start with a base branch texture that I had to first make transparent if it was not, and then create an inverted version which would serve as the alpha. The alpha is a black and white texture (white meaning opaque and black meaning transparent), appearing as the leaf itself. These texture maps must then be plugged in properly into Unreal, with the master material node set to Translucent rather than Opaque, and then plugging in the “alpha” (which is exported as part of the base color) into the opacity channel. While it took a few tries to get right, I am very happy with the results, and even more content with the fact that performance is optimized


I wanted to add in the image as well as the dog house and dog bowl were 2 of my favorite objects to texture. As a dog lover, I really wanted to create something that would represent a dog, in this case, Rose, more personally. As a result, I added her name, which was stamped onto the dog house as an alpha stamp in Substance Painter. The alpha is created in a similar fashion to the leaves that I spoke about above, but functions more as a stamp that, in this case, has height displacement. Furthermore, the addition of bones and paw prints I thought made the aura around the space more inviting and homey.
This image also showcases one of the aspects of our level that I didn’t think about until much later, but made a huge difference: the grass. Before adding this grass in, all of the land was one texture and one level. There was no play in different levels of ground and it lacked depth and complexity. Adding the grass not only provided material differentiation (foliage vs concrete), but it brought some nice color into the scene while making walking around as a dog more interactive and exciting.

The following image is a snippet of one of the newer and most important skills I picked up this quarter: the creation and application of decals. A decal is essentially a projection of a texture. You create a material and apply this to the decal projector, which you can then move around and have it hover over anything in the level and have it project that texture onto that object. Decals are very powerful because you have a lot of flexibility in where you want to place a texture, and it is a cheap way of getting some cool effects, such as this sidewalk texture effect here. Decal textures are created in the same way as alphas, in fact you need them to create a material. Ideally the decal you want to place should have a transparent background so that only the texture itself is shown and placed seamlessly on the surface.

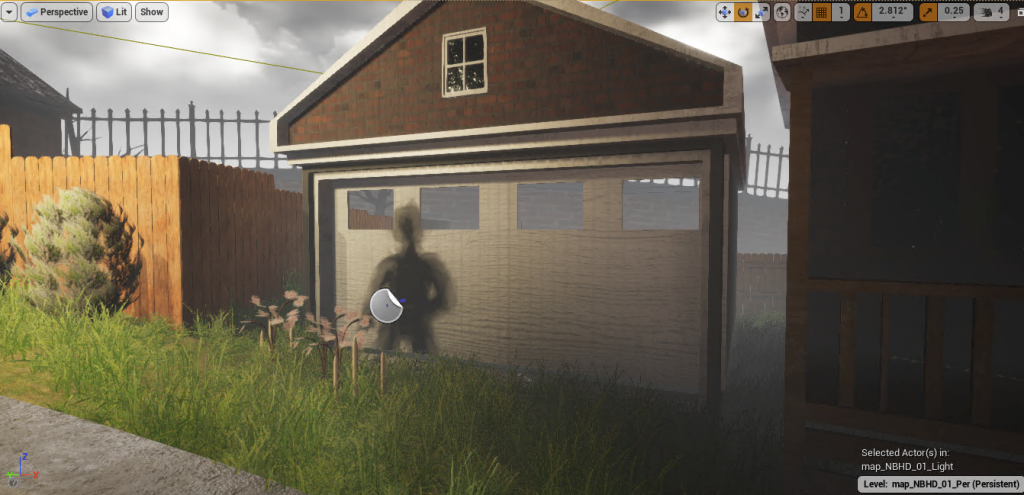
This next image is also another example of a decal. The shadow person placed on the garage was a 2D silhouette created by one of our artists, that I then created a normal map and alpha mask for in Photoshop, that I then applied to the decal projector to project the image. Decal projectors can also be rotated, so any direction that the purple arrow is facing will be the direction of the projection. Getting this decal in was not only a win for learning decals, but having these shadow people in the game in different poses meant that we were really bringing to life the themes and narrative of our game The Shadow that Pervades. The silhouettes are meant to represent people that once lived there and now only a shadow of them remains. They not only represent what our game stands for, but add to the mysteriousness and eeriness of the space. And by adding the little shrines in front of them with the candles and the flowers, it is emphasized that these people are important and were cared about.
